KubeAI for OPEA
KubeAI is an open-source AI inferencing operator. This folder contains documentation, installation instructions and deployment files for running KubeAI with OPEA inference services.
For now, OPEA enables a subset of the KubeAI features. In the future more KubeAI service will be added.
Features
The following features are available at the moment.
OpenAI APIs - tested/working
OPEA Gaudi and CPU support - tested/working
Persistent Volume cache for models - tested/working
Model downloading & inference engine deployment - tested/working
Scaling pods to/from zero - tested/working
Load based autoscaling - tested/working
Integration with OPEA application - missing
Observability - tested/working
Models
The following models are included.
Model Name |
Engine |
Hardware |
Task |
|---|---|---|---|
vLLM |
1x CPU |
Text Embeddings |
|
vLLM |
1x Gaudi |
Text Generation |
|
vLLM |
2x Gaudi |
Text Generation |
|
vLLM |
6x CPU |
Text Generation |
|
vLLM |
1x Gaudi |
Text Generation |
|
vLLM |
2x Gaudi |
Text Generation |
|
vLLM |
1x Gaudi |
Text Generation |
|
vLLM |
2x Gaudi |
Text Generation |
|
vLLM |
1x CPU |
Text Generation |
|
vLLM |
1x Gaudi |
Text Generation |
|
vLLM |
2x Gaudi |
Text Generation |
The number of Gaudi devices or CPUs required to run the model is included in the Hardware column.
Installation
Prerequisites
Kubernetes cluster
Helm
HF_TOKEN (HuggingFace) token
Dynamic Volume Provisioning (optional)
Nodes with Gaudi accelerator (optional)
Install KubeAI
The following commands will install KubeAI to kubeai namespace.
helm repo add kubeai https://www.kubeai.org
helm repo update
export HF_TOKEN=<your-hugging-face-token> # optionally, pass token file to the script
./install.sh
After the installation you should have the following pods running.
kubeai-84c999c967-5bdps                              1/1     Running   0          147m
open-webui-0                                         1/1     Running   0          152m
You should also have KubeAI CRD installed. You can verify this by running the following commands.
kubectl get crd models.kubeai.org
kubectl explain models.kubeai.org
Deploying the Models
This section describes how to deploy various models. All the examples below use Kubernetes Persistent Volumes and Claims (PV/PVC) to store the models. The Kubernetes Storage Class (SC) is called standard. You can tune the storage configuration to match your environment during the installation (see cacheProfiles in opea-values.yaml).
The models in the examples below are deployed to $NAMESPACE. Please set that according to your needs. Model README is located here models
export NAMESPACE="kubeai"
kubectl create namespace $NAMESPACE
Text Generation with Llama-3 on CPU
The following command will deploy the Meta-Llama-3.1-8B-Instruct model with vLLM engine using CPU.
kubectl apply -f models/llama-3.1-8b-instruct-cpu.yaml -n $NAMESPACE
The deployment will first create a Kubernetes job, which will download the model to a Persistent Volume (PV).
After the model is downloaded the job is completed and the model server is started. You can verify the model server is running by running the following command.
kubectl get pod -n $NAMESPACE
You should see a pod running with the name model-llama-3.1-8b-instruct-cpu-xxxx.
Text Generation with Llama-3 on Gaudi
The following commands will deploy Meta-Llama-3.1-8B-Instruct and Meta-Llama-3.3-70B-Instruct models with the vLLM engine using Gaudi accelerators.
# Meta-Llama-3.1-8B-Instruct model
kubectl apply -f models/llama-3.1-8b-instruct-gaudi.yaml -n $NAMESPACE
# Meta-Llama-3.3-70B-Instruct model
kubectl apply -f models/llama-3.3-70b-instruct-gaudi.yaml -n $NAMESPACE
The rest is the same as in the previous example. You should see a pod running with the name model-llama-3.1-8b-instruct-gaudi-xxxx. When request load for that model increases enough, KubeAI will automatically deploy more instances (model maxReplicas > minReplicas).
Latter model is set to scale from zero (minReplicas = 0), so model-llama-3.3-70b-instruct-gaudi-xxxx pod(s) will be present only when KubeAI gets requests for that model (avoids multiple devices being exclusively reserved for idle pods, but significantly slows down first response).
Text Embeddings with BGE on CPU
The following command will deploy the BAAI/bge-base-en-v1.5 model with vLLM engine using CPU.
kubectl apply -f models/bge-embed-text-cpu.yaml -n $NAMESPACE
The rest is the same as in the previous example. You should see a pod running with the name model-bge-embed-text-cpu-xxxx.
Using the Models
Assuming you don’t have any ingress gateway available, you can use the below kubectl port-forward command to access the models you have deployed.
kubectl port-forward svc/kubeai -n kubeai 8000:80
Query the models available:
curl localhost:8000/openai/v1/models
Depending on your configuration you should have something like this as an answer to the above command.
{
  "object": "list",
  "data": [
    {
      "id": "llama-3.1-8b-instruct-gaudi",
      "created": 1743594352,
      "object": "model",
      "owned_by": "",
      "features": [
        "TextGeneration"
      ]
    },
  ]
}
Use the following command to query the model.
curl "http://localhost:8000/openai/v1/chat/completions" \
    -H "Content-Type: application/json" \
    -d '{
        "model": "llama-3.1-8b-instruct-gaudi",
        "messages": [
            {
                "role": "system",
                "content": "You are a helpful assistant."
            },
            {
                "role": "user",
                "content": "What should I do in Finland during the winter time?"
            }
        ]
    }'
Enjoy the answer!
CPU Performance Optimization with NRI
Overview
NRI plugins provide a way to optimize the node-level resource assignment of applications in a Kubernetes cluster. They connect to the container runtime and are able, for example, to adjust the CPU and memory pinning of containers.
This section provides a guide on how to use the Balloons Policy plugin from the NRI Plugins project to optimize the performance of CPU-backed KubeAI profiles.
Installation of Balloons Policy Plugin
NOTE: To avoid disturbing already running workloads, it is recommended to install the NRI plugin on an empty node, that is, before deploying workloads (do it right after node bootstrap, or drain the node before installation).
Install the balloons policy plugin with Helm:
helm repo add nri-plugins https://containers.github.io/nri-plugins
helm repo update nri-plugins
helm install -n kube-system balloons nri-plugins/nri-resource-policy-balloons
NOTE: With containerd version prior to v2.0, first enable NRI support in the containerd configuration file. Instead of manually editing the configuration file, you can pass in
--set nri.runtime.patchConfig=trueto the Helm command above, which will automatically patch the containerd configuration file on each node.
Verify that the balloons policy plugin is running on every node:
$ kubectl -n kube-system get ds nri-resource-policy-balloons
NAME                           DESIRED   CURRENT   READY   UP-TO-DATE   AVAILABLE   NODE SELECTOR            AGE
nri-resource-policy-balloons   2         2         2       2            2           kubernetes.io/os=linux   77s
Configuration of Balloons Policy Plugin
The aim of the balloons policy configuration is to isolate the model inference engine containers, to minimize noisy neighbor effects between containers.
An example configuration for the current CPU-backed model profiles:
cat <<EOF | kubectl apply -f -
apiVersion: config.nri/v1alpha1
kind: BalloonsPolicy
metadata:
  name: default
  namespace: kube-system
spec:
  allocatorTopologyBalancing: true
  balloonTypes:
  - name: kubeai-inference
    allocatorPriority: high
    preferNewBalloons: true
    hideHyperthreads: true
    matchExpressions:
    - key: pod/labels/app.kubernetes.io/name
      operator: In
      values: ["vllm", "ollama"]
    - key: name
      operator: In
      values: ["server"]
    # Enables container-level information for the balloon in NodeResourceTopology objects
    # if agent.nodeResourceTopology is enabled.
    showContainersInNrt: true
  - name: default
    namespaces:
    - "*"
    shareIdleCPUsInSame: numa
  pinCPU: true
  pinMemory: false
  reservedPoolNamespaces:
  - kube-system
  reservedResources:
    cpu: "2"
  log:
    debug: ["policy"]
  instrumentation:
    httpEndpoint: :8891
    prometheusExport: true
  # NodeResourceTopology custom resource objects can be enabled for debugging
  # and to examine the CPU pinning of inference containers. Not recommended
  # for production because it can cause excessive load on the kube-apiserver.
  #agent:
  #  nodeResourceTopology: true
EOF
The configuration above allocates full CPU cores to the inference engine
containers by hiding hyperthreads from them. For example, if a pod requests 6
CPUs, the balloon will reserve 6 full physical CPU cores (i.e., 12 logical
CPUs), but configure the cpuset so that the inference instance can only use 6
logical CPUs – one per core – while the sibling hyperthreads remain unused.
A new dedicated kubeai-inference balloon is created for each inference engine
container, as long as enough free CPUs are available on the system.
Additionally, it distributes the kubeai-inference balloons across CPU
sockets.
See balloons-policy documentation and the OPEA platform optimization guide for more details on the configuration options.
Observability
With kube-prometheus-stack Helm chart already deployed, install script will automatically enable monitoring for the vLLM inference engine pods.
If script did not detect it, one can specify Prometheus Helm chart release manually:
release=prometheus-stack
./install.sh $release
If script finds also a (running) Grafana instance, it will install “vLLM scaling” and “vLLM details” dashboards for it.
But they can be installed also manually afterwards:
ns=monitoring # Grafana namespace
kubectl apply -n $ns -f grafana/vllm-scaling.yaml -f grafana/vllm-details.yaml
Then port-forward Grafana.
kubectl port-forward -n $ns svc/$release-grafana 3000:80
Open web-browser to http://localhost:3000 with admin / prom-operator given as the username / password for login, to view the dashboards.
Both dashboards filter the viewed vLLM instances by the selected namespace (e.g. kubeai) and the model they use.
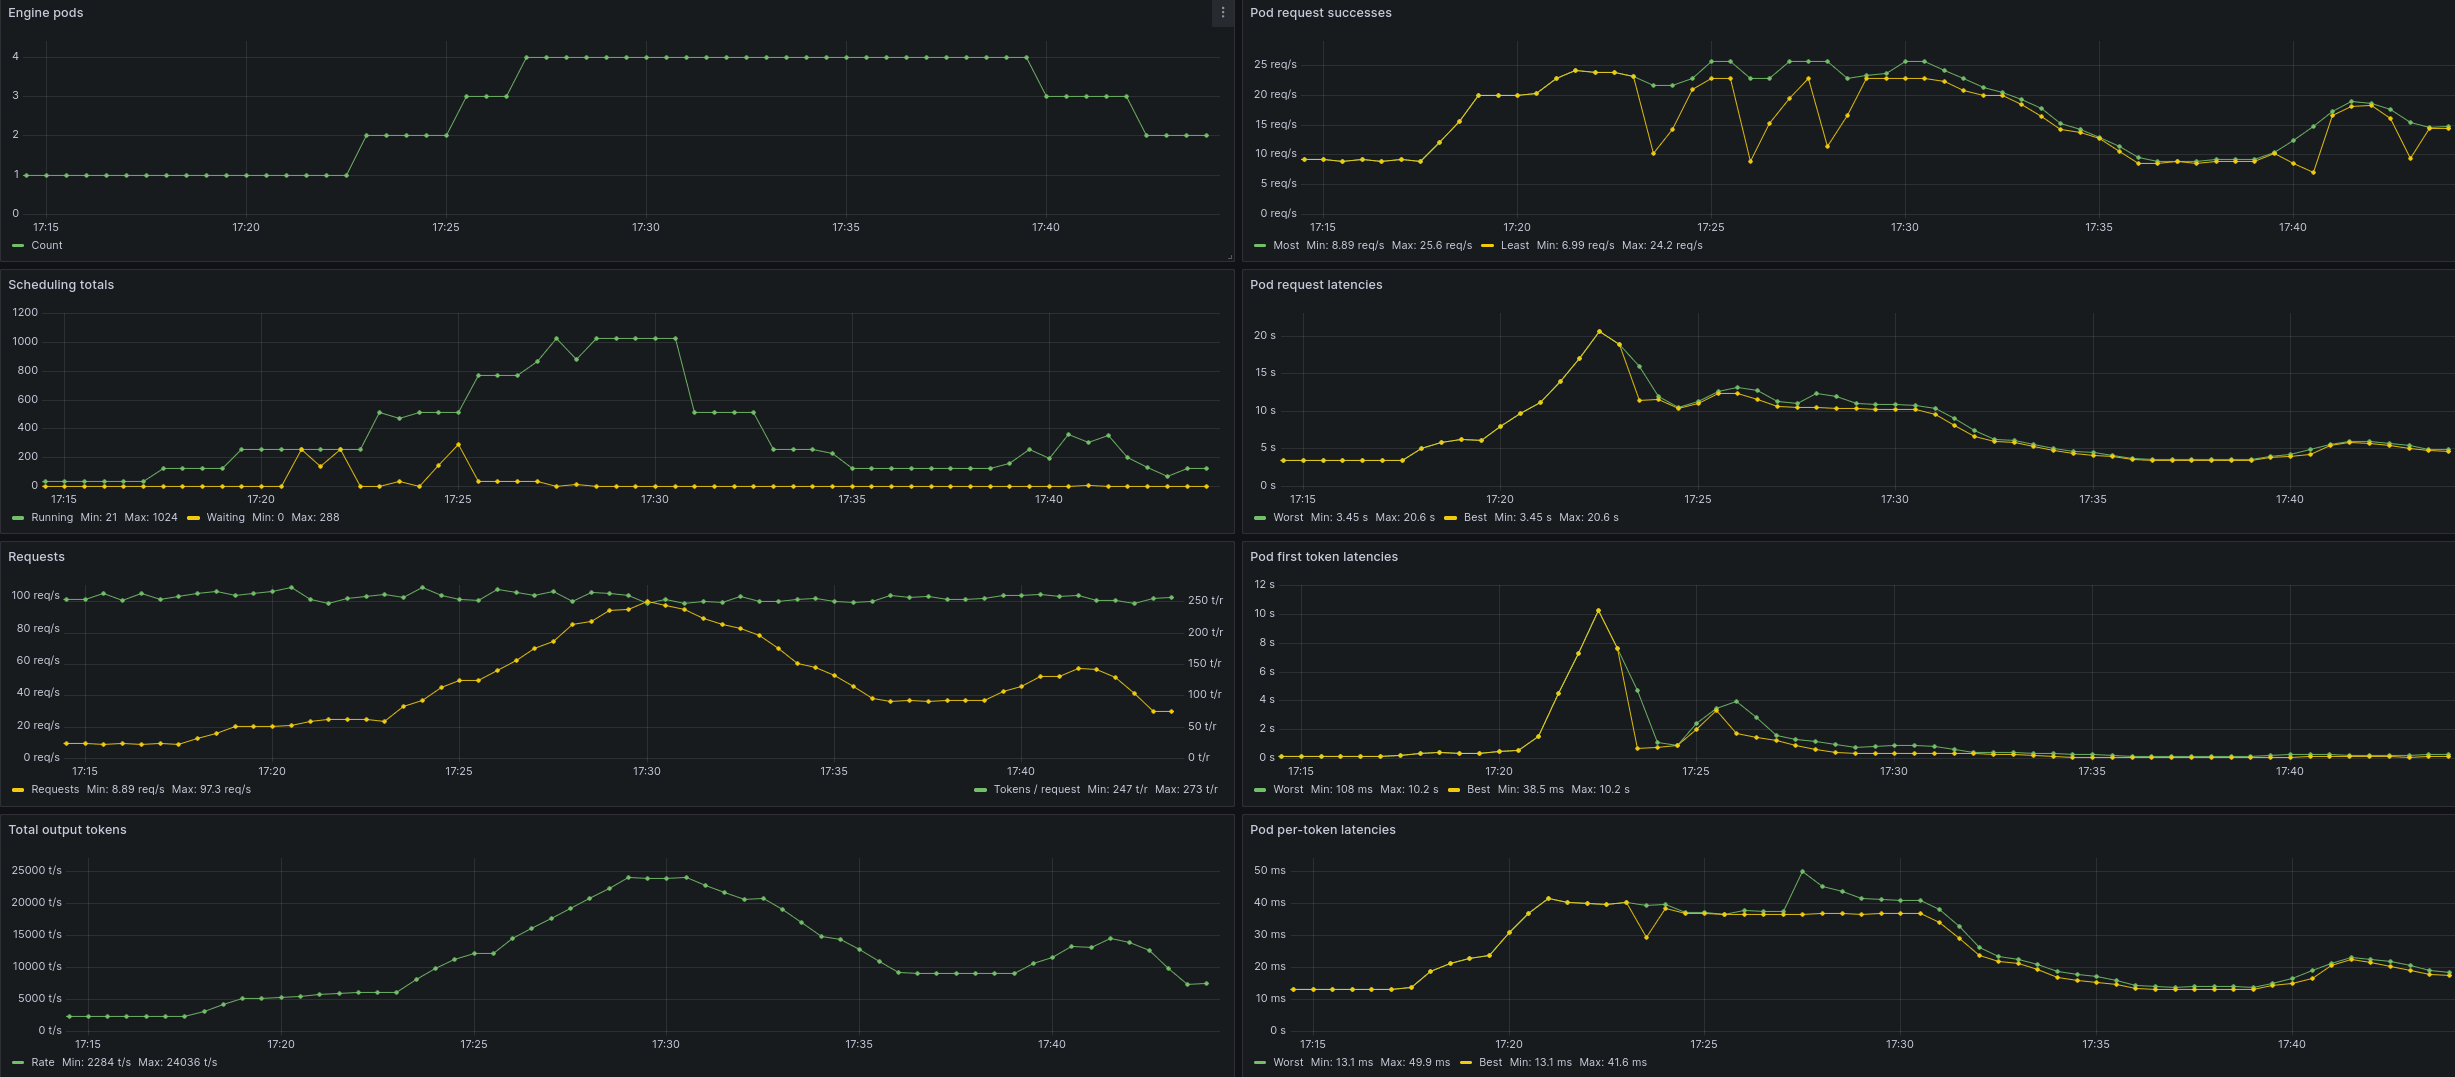
The scaling dashboard shows trends both for sum of metrics across all these instances, as well as the best and worst per-instance metric values at a given moment.
Whereas details dashboard shows more detailed engine metrics for the selected vLLM instance (or all of them).

Note:
Dashboards should be visible in Grafana within a minute of them being applied, but
vLLM metrics will be available only after the first inference request has been processed