Getting Started with OPEA
This is a guide to deploy the ChatQnA application from OPEA GenAIExamples across multiple cloud platforms, including Amazon Web Services (AWS), Google Cloud Platform (GCP), IBM Cloud, Microsoft Azure Oracle Cloud Infrastructure, and Intel® Tiber™ AI Cloud, enabling developers for specific needs and requirements. For additional deployment targets, see the ChatQnA tutorial.
Understanding OPEA’s Core Components
Before moving forward, it’s important to get familiar with two key elements of OPEA: GenAIComps and GenAIExamples.
GenAIComps is a collection of microservice components that form a service-based toolkit. This includes a variety of services such as llm (large language models), embedding, and reranking, among others.
GenAIExamples provides practical and deployable solutions to help users implement these services effectively. Examples include ChatQnA and DocSum, which leverage the microservices for specific applications.
Prerequisites
Create and Configure a Virtual Server
Step 1: Create Virtual Server
Open the AWS console and search for EC2 in the search bar.
Select Launch instance to start creating a virtual server.
Under Name and tags, name the virtual server in the Name field.
Under Quick Start, choose Ubuntu (
ami-id : ami-04dd23e62ed049936) as the base OS.In Instance type, select an instance for the desired Intel processor.
Note: It is recommended to use the
m7i.4xlargeor larger instance for an Intel® 4th Gen Xeon© Scalable Processor. For more information on virtual servers on AWS, visit the AWS and Intel page.Create a new key pair for SSH access by naming it, or select an existing key pair from the dropdown list.
Under Network Settings:
Choose an existing security group, or
Select Create security group and enable Allow SSH traffic and Allow HTTP traffic.
In Storage, set the size to 100 GiB.
Select Launch instance to launch the virtual server. A Success banner confirms the launch.
Step 2: Connect and Configure the Virtual Server
Select Connect, and connect using the preferred connection method.
Search for Security Groups in the search bar and select the security group used when creating the instance.
Select Edit inbound rules on the right side of the window.
To add a rule, select Add rule and enter the following:
Type: Custom TCP
Port Range: 80
Source: 0.0.0.0/0
Note: To learn more, see editing inbound or outbound rules from AWS documentation.
Select Save rules to commit the changes.
Navigate to GCP console – Click the “Create a VM” button.
Provide a name to the VM.
Select the base OS as
Ubuntu 24.04 LTSfrom Marketplace .Select an Instance type that is based on Intel hardware.
Note: It is recommended to select a
c4-standard-32or larger instance with an Intel(R) 4th Gen Xeon(C) Scalable Processor, and the minimum supported c3 instance type is c3-standard-8 with 32GB memory. For more information, visit virtual servers on GCP.
Under Firewall settings select “Allow HTTP traffic” to access ChatQnA UI web portal.
Change the Boot disk to 100 GiB and click “Create”.
Use any preferred SSH method such as “Open in browser window” to connect to the instance.
Navigate to IBM Cloud. - Click the “Create resource” button at the top right of the screen. Select “Compute” from the options available and select “Virtual Server for VPC”
Select a location for the instance. Assign a name to it.
Under Stock Images, select Ubuntu 24.04 (
ibm-ubuntu-24-04-6-minimal-amd64-1)Select a virtual server.
Note: It is recommended to select a 3-series instance with an Intel(R) 4th Gen Xeon(C) Scalable Processor, such as
bx3d-16x80or above. For more information on virtual servers on IBM cloud visit Intel® solutions on IBM Cloud®.
Add an SSH key to the instance, if necessary, create one first.
Click on “Create virtual server”.
Once the instance is running, create and attach a “Floating IP” to the instance. For more information visit this site
Under “Infrastructure” in the left pane, go to Network/Security groups/
/Rules Select “Create”
Enable inbound traffic for port 80. For more information on editing inbound/outbound rules, click here
ssh into the instance using the floating IP (
ssh -i <key> ubuntu@<floating-ip>)
Navigate to Microsoft Azure – Select the “Skip” button on the bottom right to land on the service offerings page. Search for “Virtual Machines” in the search bar and select it. Click the “Create” button and select “Azure Virtual Machine”.
Select an existing “Resource group” from the drop down or click “Create” for a new Resource group and give it a name. If there are issues refer to cannot create resource groups.
Provide a name to the VM and select the base OS as
Ubuntu 24.04 LTSSelect x64 in VM architecture.
Select an Instance type that is based on Intel hardware.
Note: It is recommended to select a
Standard_D16ds_v5instance or larger with an Intel(R) 3rd/4th Gen Xeon(C) Scalable Processor. This family of instances can be found in the (US) West US Region. Visit for more information virtual machines on Azure.
Select Password as Authentication type and create username and password for the instance.
Choose the Allow selected ports in Inbound port rule section and select HTTP.
Click “Next: Disk” button and select OS disk size as 128GiB.
Click on “Review + Create” to launch the VM.
Click Go to resource -> Connect -> Connect -> SSH using Azure CLI. Accept the terms and then select “Configure + connect”
Note: If there are issues connecting to the instance with SSH, trying connecting via the Bastion host with the username and password.
Login to Oracle Cloud Console – Then navigate to Compute Instances. Click the “Create Instance” button.
Provide a name to the VM and select the placement in the availability domains.
In Image and Shape section click “Change Image” > “Ubuntu” and then select
Canonical Ubuntu 24.04. Submit using the “Select Image” button at the bottom.Click the “Change Shape” > “Bare Metal Machine” then select the
BM.Standard3.64. Submit using the “Select Shape” button at the bottom.Select the VCN and the public subnet that the server needs to reside in. If a new VCN/Subnet needs to be created then select the “Create new virtual cloud network” and the “Create new public subnet” to create a subnet that is exposed to the internet.
Next, save a private key by or upload an existing public key.
Specify a boot volume size of 100 GiB with 30 VPU units of performance.
Click Create to launch the instance.
Note the public IP address of the machine once its launched.
Once the instance is launched, click on the subnet in the Primary VNIC section. Then click on the “Default Security List for vcn-xxxxxxxx-xxxx” , click on the “Add Ingress Rules”. Add the following information:
Source CIDR: 0.0.0.0/0
Source Port Range: All
Destination Port Range: 80
Click on “Add Ingress Rule”
Connect using ssh (
ssh -i <private_key> ubuntu@<public_ip_address>).
Sign up to create an account or log in to Intel® Tiber™ AI Cloud. Check if there are sufficient cloud credits and purchase or redeem a coupon if needed. Go to the “Compute” tab on the left and click on “Instances”. In the center of the screen, click on the “Launch instance” button.
Select the instance configuration, instance type, and machine image which will be Ubuntu.
Note: It is recommended to use the
VM-SPR-LRGpowered by 4th Generation Intel® Xeon® Scalable processors with 64GB of memory and 64GB of disk or more to use a CPU to run an 8B-parameter model. Intel® Gaudi® AI Accelerators can also be used after requesting access. Click here to request the recommended VM instance. Users can request a single VM to do a single node docker deploy or obtain a kubernetes cluster of one or more nodes.
Fill out the rest of the form such as giving the instance a name and answering any additional questions.
Add the public key for SSH. Select a previously uploaded key or upload a key. The “Upload Key” button also provides instructions on how to create a new SSH key.
Click “Launch instance” to start the machine.
Go back to the “Compute” tab and under “Instances”, note down the private IP address of the new VM.
If the UI needs to be accessible to others, proceed to the next step to create a load balancer. Otherwise, skip to Step 10 which will explain how to connect to the VM with port forwarding.
Create a load balancer. This can be found in Compute->Load Balancers. Click on “Launch Load Balancer”. Request for access if needed. Fill out the form with the following info:
Name: Name for load balancer
Source IP: The private IP address of the VM in Step 6
Listener Port: The NGINX port i.e. 80
Instance Port: The NGINX port i.e. 80
Monitor Type: HTTP
Mode: Round Robin
Instances: Select the name of the VM created
Note: If the NGINX port changes for ChatQnA, set the Listener and Instance ports accordingly.
Click “Launch”.
Go back to Compute->Load Balancers to see the new load balancer. Note down the virtual IP address. This is what will be used to access the UI of ChatQnA on a web browser.
Go to Instances, click on the name of the instance, and then click on “How to Connect via SSH”. Follow the instructions to set up the SSH config and locate the SSH key. On the final step to run an SSH command to connect to the VM, add the -i argument with the private key and -L to forward port 80 if needed. Follow the command template below:
ssh -i <private_key> -J guest@<proxy_jump_ip_address> -L 80:localhost:80 ubuntu@<private_ip_address_of_vm
If a load balancer is used, there is no need to include -L 80:localhost:80.
Deploy the ChatQnA Solution
Use the command below to install docker:
wget https://raw.githubusercontent.com/opea-project/docs/refs/heads/main/guide/installation/install_docker.sh
chmod +x install_docker.sh
./install_docker.sh
Configure Docker to run as a non-root user by following these instructions
Clone the repo. It is recommended to checkout a specific release version (i.e. 1.0, 1.1, 1.2, etc):
export RELEASE_VERSION=<release-version>
git clone https://github.com/opea-project/GenAIExamples.git
cd GenAIExamples
git checkout tags/v${RELEASE_VERSION}
Set the required environment variables:
# Use localhost
export host_ip="localhost"

# Generate a token from HuggingFace and set it here
export HUGGINGFACEHUB_API_TOKEN="Huggingface_API_Token"

# Example: NGINX_PORT=80
export NGINX_PORT="NGINX_Port"
Set up proxies if the machine is behind a firewall:
export http_proxy="HTTP_Proxy"
export https_proxy="HTTPs_Proxy"
# Example: no_proxy="localhost, 127.0.0.1, 192.168.1.1"
export no_proxy="No_Proxy",chatqna-xeon-ui-server,chatqna-xeon-backend-server,dataprep-redis-service,tei-embedding-service,retriever,tei-reranking-service,tgi-service,vllm-service
Set up other specific use-case environment variables in set_env.sh before running it. For example, this is where model(s) can be changed.
cd ChatQnA/docker_compose/intel/cpu/xeon/
source set_env.sh
Start the services:
docker compose -f compose.yaml up -d
Note: It takes a few minutes for the services to start. Check the logs for the services to ensure that ChatQnA is running before proceeding further. If there is an error related to a port already in use, either 1) modify the
compose.yamlto use another port or 2) stop the service using that port before retrying thedocker composecommand.
For example to check the logs for the vllm-service:
docker logs vllm-service | grep Complete
Proceed further only after the output shows Application startup complete. as shown:
INFO:     Started server process [1]
INFO:     Waiting for application startup.
INFO:     Application startup complete.
INFO:     Uvicorn running on http://0.0.0.0:80 (Press CTRL+C to quit)
Run docker ps -a as an additional check to verify that all the services are running as shown. Notice the version of the docker images matches the RELEASE_VERSION specified.
| CONTAINER ID | IMAGE                                                  | COMMAND                 | CREATED    | STATUS     | PORTS                                                                                 | NAMES                        |
|--------------|--------------------------------------------------------|------------------------|------------|------------|------------------------------------------------------------------------------------------|------------------------------|
| d992b34fda27 | opea/nginx:1.2                                         | "/docker-entrypoint.…" | 6 days ago | Up 6 days | 0.0.0.0:80->80/tcp, :::80->80/tcp                                                     | chatqna-xeon-nginx-server    |
| 2d297d595650 | opea/chatqna-ui:1.2                                    | "docker-entrypoint.s…" | 6 days ago | Up 6 days | 0.0.0.0:5173->5173/tcp, :::5173->5173/tcp                                             | chatqna-xeon-ui-server    |
| 0b9b2be1feef | opea/chatqna-without-rerank:1.2                        | "python chatqna.py -…" | 6 days ago | Up 6 days | 0.0.0.0:8888->8888/tcp, :::8888->8888/tcp                                             | chatqna-xeon-backend-server    |
| b64ba100723c | opea/dataprep:1.2                                      | "sh -c 'python $( [ …" | 6 days ago | Up 6 days | 0.0.0.0:6007->5000/tcp, [::]:6007->5000/tcp                                             | dataprep-redis-server    |
| a9b93207988d | opea/retriever:1.2                                     | "python opea_retriev…" | 6 days ago | Up 6 days | 0.0.0.0:7000->7000/tcp, :::7000->7000/tcp                                             | retriever-redis-server    |
| 4bf653d83cba | redis/redis-stack:7.2.0-v9                             | "/entrypoint.sh"       | 6 days ago | Up 6 days | 0.0.0.0:6379->6379/tcp, :::6379->6379/tcp, 0.0.0.0:8001->8001/tcp, :::8001->8001/tcp   | redis-vector-db    |
| b2774012be67 | ghcr.io/huggingface/text-embeddings-inference:cpu-1.5  | "text-embeddings-rou…" | 6 days ago | Up 6 days | 0.0.0.0:6006->80/tcp, [::]:6006->80/tcp                                             | tei-embedding-server    |
| 6407712b6f9b | opea/vllm:1.2                                          | "python3 -m vllm.ent…" | 6 days ago | Up 6 days | 0.0.0.0:9009->80/tcp, [::]:9009->80/tcp                                             | vllm-service    |
Interact with ChatQnA
Interact with ChatQnA via a browser interface:
To view the ChatQnA interface, open a browser and navigate to the UI by inserting the public facing IP address: `http://{public_ip}:80’.
Note: For users running on ITAC, open a browser to localhost:80 if using port forwarding OR the virtual IP address of the load balancer.
When asking a sample question such as ‘What is OPEA?’, a snapshot of the interface may look like:
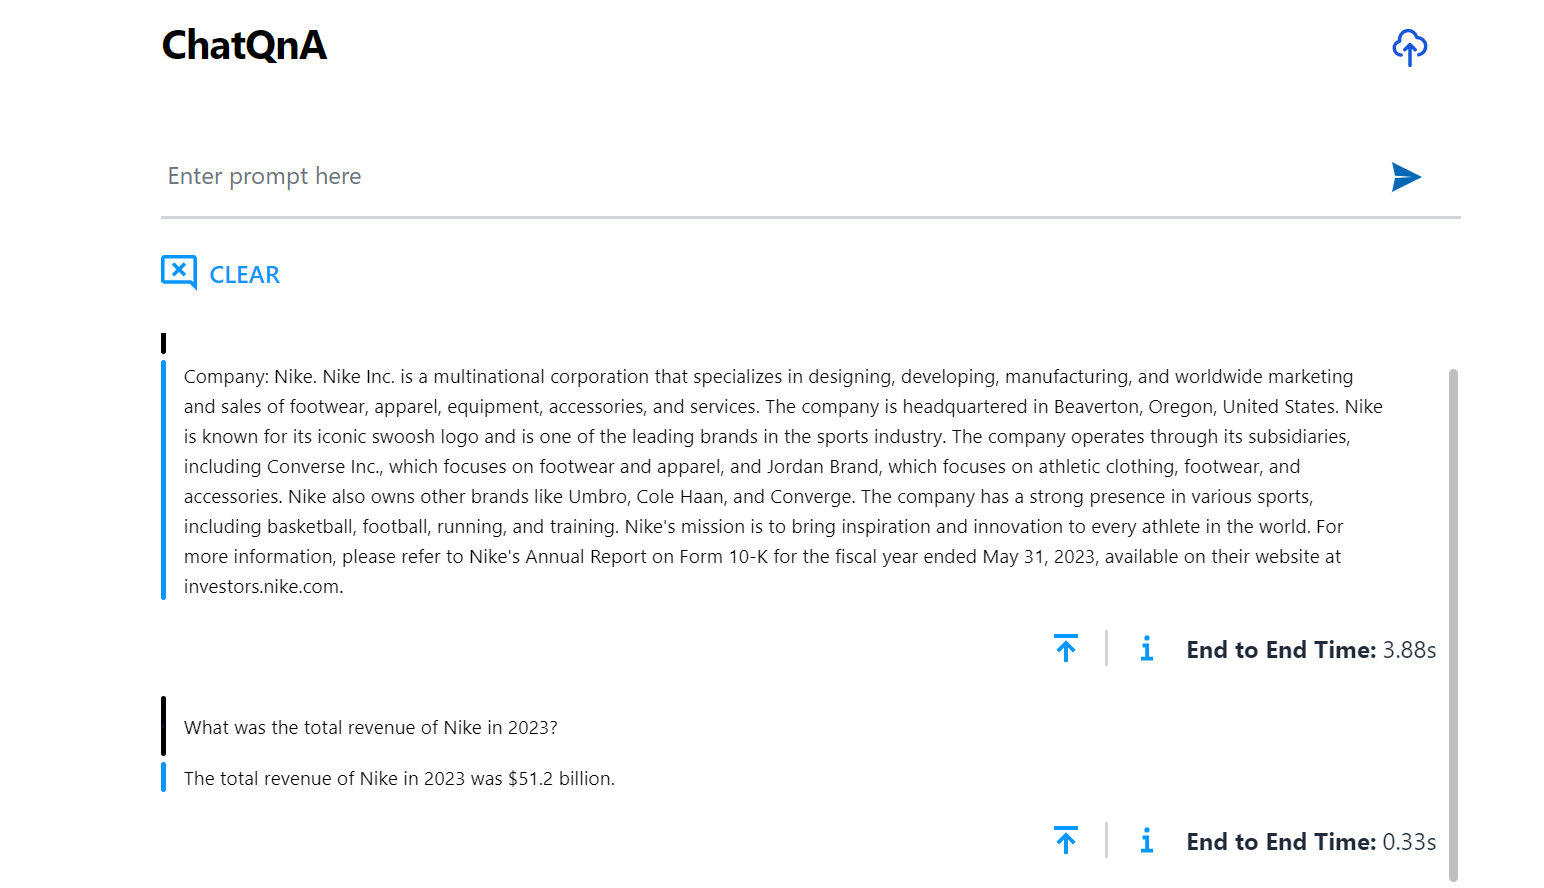
Given that any information about OPEA was not in the training data for the model, the model hallucinates and comes up with an incorrect response. To address this, upload a document (PDF) with information and observe how the response changes.
Note: this example leverages the OPEA document for its RAG based content. This OPEA document can be downloaded and uploaded using the UI.
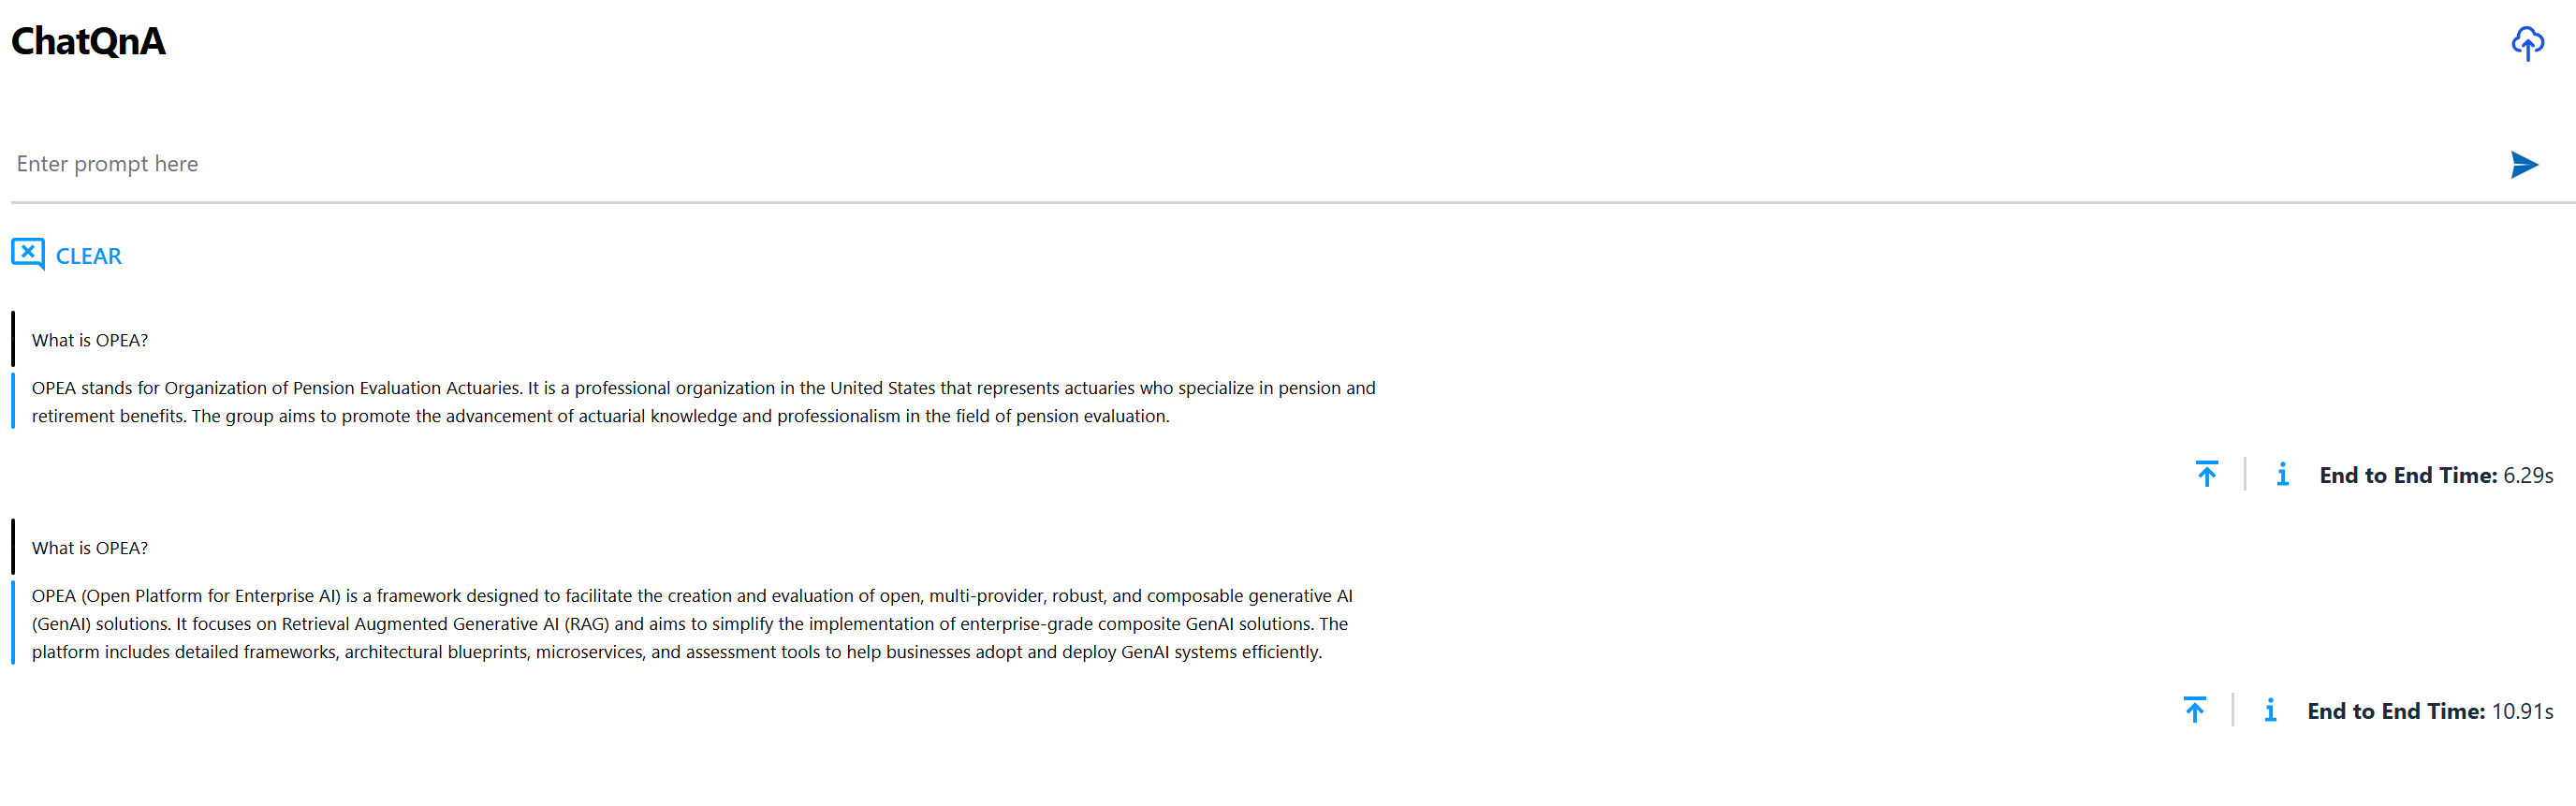
Observe that the response is relevant and is based on the PDF uploaded. See the ChatQnA to learn how to customize the example with other content.
What’s Next
Try GenAIExamples in-detail starting with mores example.
Try GenAIComps to build microservices.
Get Involved
Calling all developers! If there is interest in building out GenAI components, microservices, and solutions to be a part of this evolving technology in its early stages:
Register for the mailing list:
Subscribe to the working group mailing lists
Go to the Community Section of the OPEA repo for Contribution Guidelines and step by step instructions.
Attend any of our community events and hackathons. https://wiki.lfaidata.foundation/display/DL/OPEA+Community+Events
Current GenAI Examples
Simple chatbot that uses retrieval augmented generation (RAG) architecture. ChatQnA
Code generation, from enabling non-programmers to generate code to improving productivity with code completion of complex applications. CodeGen
Make applications more flexible by porting to different languages. CodeTrans
Create summaries of news articles, research papers, technical documents, etc. to streamline content systems. DocSum
Mimic human behavior by iteratively searching, selecting, and synthesizing information across large bodies of content. SearchQnA
Provide text descriptions from pictures, enable users to inquire directly about products, services, sites, etc. VisualQnA
Reduce language barriers through customizable text translation systems. Translation