Deploy Finance Agent on Intel® Gaudi® AI Accelerator with Docker Compose
This README provides instructions for deploying the Finance Agent application using Docker Compose on systems equipped with Intel® Gaudi® AI Accelerators. It leverages containers optimized for Gaudi for the LLM serving component, along with CPU-based containers for other microservices like embedding, retrieval, data preparation and the UI.
Table of Contents
Prerequisites
Docker and Docker Compose installed.
Intel® Gaudi® AI Accelerator(s) with the necessary drivers and software stack installed on the host system. (Refer to Intel Gaudi Documentation).
Git installed (for cloning repository).
Hugging Face Hub API Token (for downloading models).
Access to the internet (or a private model cache).
Finnhub API Key. Go to https://finnhub.io/ to get your free api key.
Financial Datasets API Key. Go to https://docs.financialdatasets.ai/ to get your free api key.
Clone the GenAIExamples repository:
mkdir /path/to/your/workspace/
export WORKDIR=/path/to/your/workspace/
cd $WORKDIR
git clone https://github.com/opea-project/GenAIExamples.git
cd GenAIExamples/FinanceAgent/docker_compose/intel/hpu/gaudi
Finance Agent Quick Start Deployment
This uses the default vLLM-based deployment profile (vllm-gaudi-server).
Configure Environment
Set required environment variables in your shell:
# Path to your model cache
export HF_CACHE_DIR="./data"
# Some models from Hugging Face require approval beforehand. Ensure you have the necessary permissions to access them.
export HF_TOKEN="your_huggingface_token"
export FINNHUB_API_KEY="your-finnhub-api-key"
export FINANCIAL_DATASETS_API_KEY="your-financial-datasets-api-key"

# Configure HOST_IP
# Replace with your host's external IP address (do not use localhost or 127.0.0.1).
export HOST_IP=$(hostname -I | awk '{print $1}')

# Optional: Configure proxy if needed
# export HTTP_PROXY="${http_proxy}"
# export HTTPS_PROXY="${https_proxy}"
# export NO_PROXY="${NO_PROXY},${HOST_IP}"

source set_env.sh
Note: The compose file might read additional variables from set_env.sh. Ensure all required variables like ports (LLM_SERVICE_PORT, TEI_EMBEDDER_PORT, etc.) are set if not using defaults from the compose file. For instance, edit the set_env.sh or overwrite LLM_MODEL_ID to change the LLM model.
Start Services
Deploy with Docker Compose
Below is the command to launch services
tei-embedding-serving
redis-vector-db
redis-kv-store
dataprep-redis-server-finance
finqa-agent-endpoint
research-agent-endpoint
docsum-vllm-gaudi
supervisor-agent-endpoint
agent-ui
docker compose -f compose.yaml up -d
[Optional] Build docker images
This is only needed if the Docker image is unavailable or the pull operation fails.
cd $WORKDIR/GenAIExamples/FinanceAgent/docker_image_build
# get GenAIComps repo
git clone https://github.com/opea-project/GenAIComps.git
# build the images
docker compose -f build.yaml build --no-cache
If deploy on Gaudi, also need to build vllm image.
cd $WORKDIR
git clone https://github.com/HabanaAI/vllm-fork.git
# get the latest release tag of vllm gaudi
cd vllm-fork
VLLM_VER=v0.10.0
echo "Check out vLLM tag ${VLLM_VER}"
git checkout ${VLLM_VER}
docker build --no-cache -f Dockerfile.hpu -t opea/vllm-gaudi:latest --shm-size=128g . --build-arg https_proxy=$https_proxy --build-arg http_proxy=$http_proxy
Validate Services
Wait several minutes for models to download and services to initialize (Gaudi initialization can take time). Check container logs (docker compose logs -f <service_name>, especially vllm-gaudi-server).
docker logs --tail 2000 -f vllm-gaudi-server
Below is the expected output of the
vllm-gaudi-serverservice.
   INFO:     Started server process [1]
   INFO:     Waiting for application startup.
   INFO:     Application startup complete.
   INFO:     Uvicorn running on http://0.0.0.0:8000 (Press CTRL+C to quit)
   INFO:     <IP>:<Port Number> - "GET /health HTTP/1.1" 200 OK
Validate Data Services
Ingest data and retrieval from database
python $WORKDIR/GenAIExamples/FinanceAgent/tests/test_redis_finance.py --port 6007 --test_option ingest
python $WORKDIR/GenAIExamples/FinanceAgent/tests/test_redis_finance.py --port 6007 --test_option get
Validate Agents
FinQA Agent:
export agent_port="9095"
prompt="What is Gap's revenue in 2024?"
python3 $WORKDIR/GenAIExamples/FinanceAgent/tests/test.py --prompt "$prompt" --agent_role "worker" --ext_port $agent_port
Research Agent:
export agent_port="9096"
prompt="generate NVDA financial research report"
python3 $WORKDIR/GenAIExamples/FinanceAgent/tests/test.py --prompt "$prompt" --agent_role "worker" --ext_port $agent_port --tool_choice "get_current_date" --tool_choice "get_share_performance"
Supervisor Agent single turns:
export agent_port="9090"
python3 $WORKDIR/GenAIExamples/FinanceAgent/tests/test.py --agent_role "supervisor" --ext_port $agent_port --stream
Supervisor Agent multi turn:
export agent_port="9090"
python3 $WORKDIR/GenAIExamples/FinanceAgent/tests/test.py --agent_role "supervisor" --ext_port $agent_port --multi-turn --stream
Accessing the User Interface (UI)
The UI microservice is launched in the previous step with the other microservices.
To see the UI, open a web browser to http://${HOST_IP}:5175 to access the UI. Note the HOST_IP here is the host IP of the UI microservice.
Create Admin Account with a random value
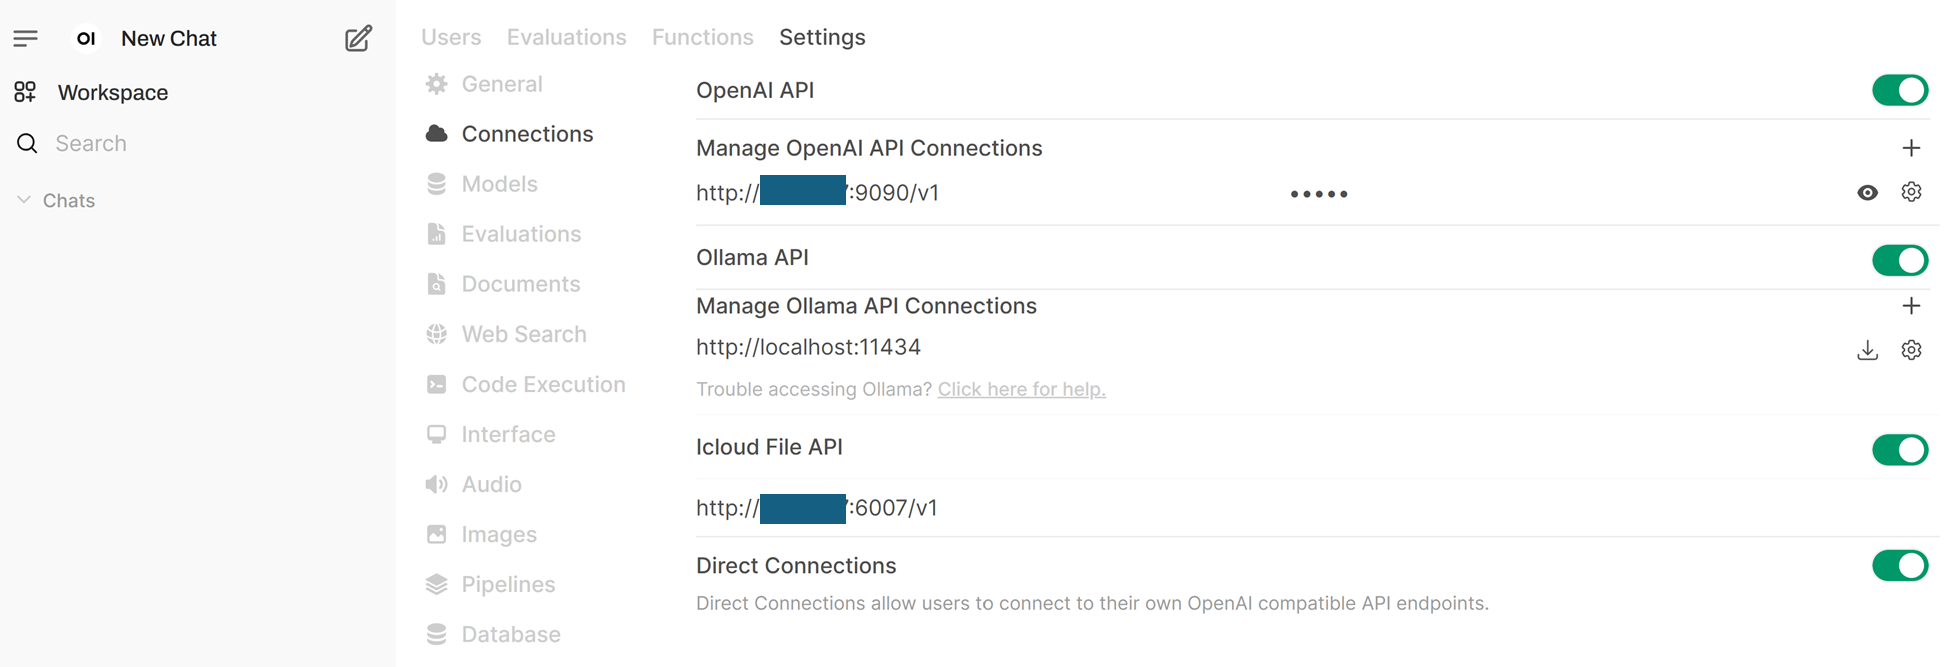
Enter the endpoints in the
ConnectionssettingsFirst, click on the user icon in the upper right corner to open
Settings. Click onAdmin Settings. Click onConnections.Then, enter the supervisor agent endpoint in the
OpenAI APIsection:http://${HOST_IP}:9090/v1. Enter the API key as “empty”. Add an arbitrary model id inModel IDs, for example, “opea_agent”. TheHOST_IPhere should be the host ip of the agent microservice.Then, enter the dataprep endpoint in the
Icloud File APIsection. You first need to enableIcloud File APIby clicking on the button on the right to turn it into green and then enter the endpoint url, for example,http://${HOST_IP}:6007/v1. TheHOST_IPhere should be the host ip of the dataprep microservice.You should see screen like the screenshot below when the settings are done.
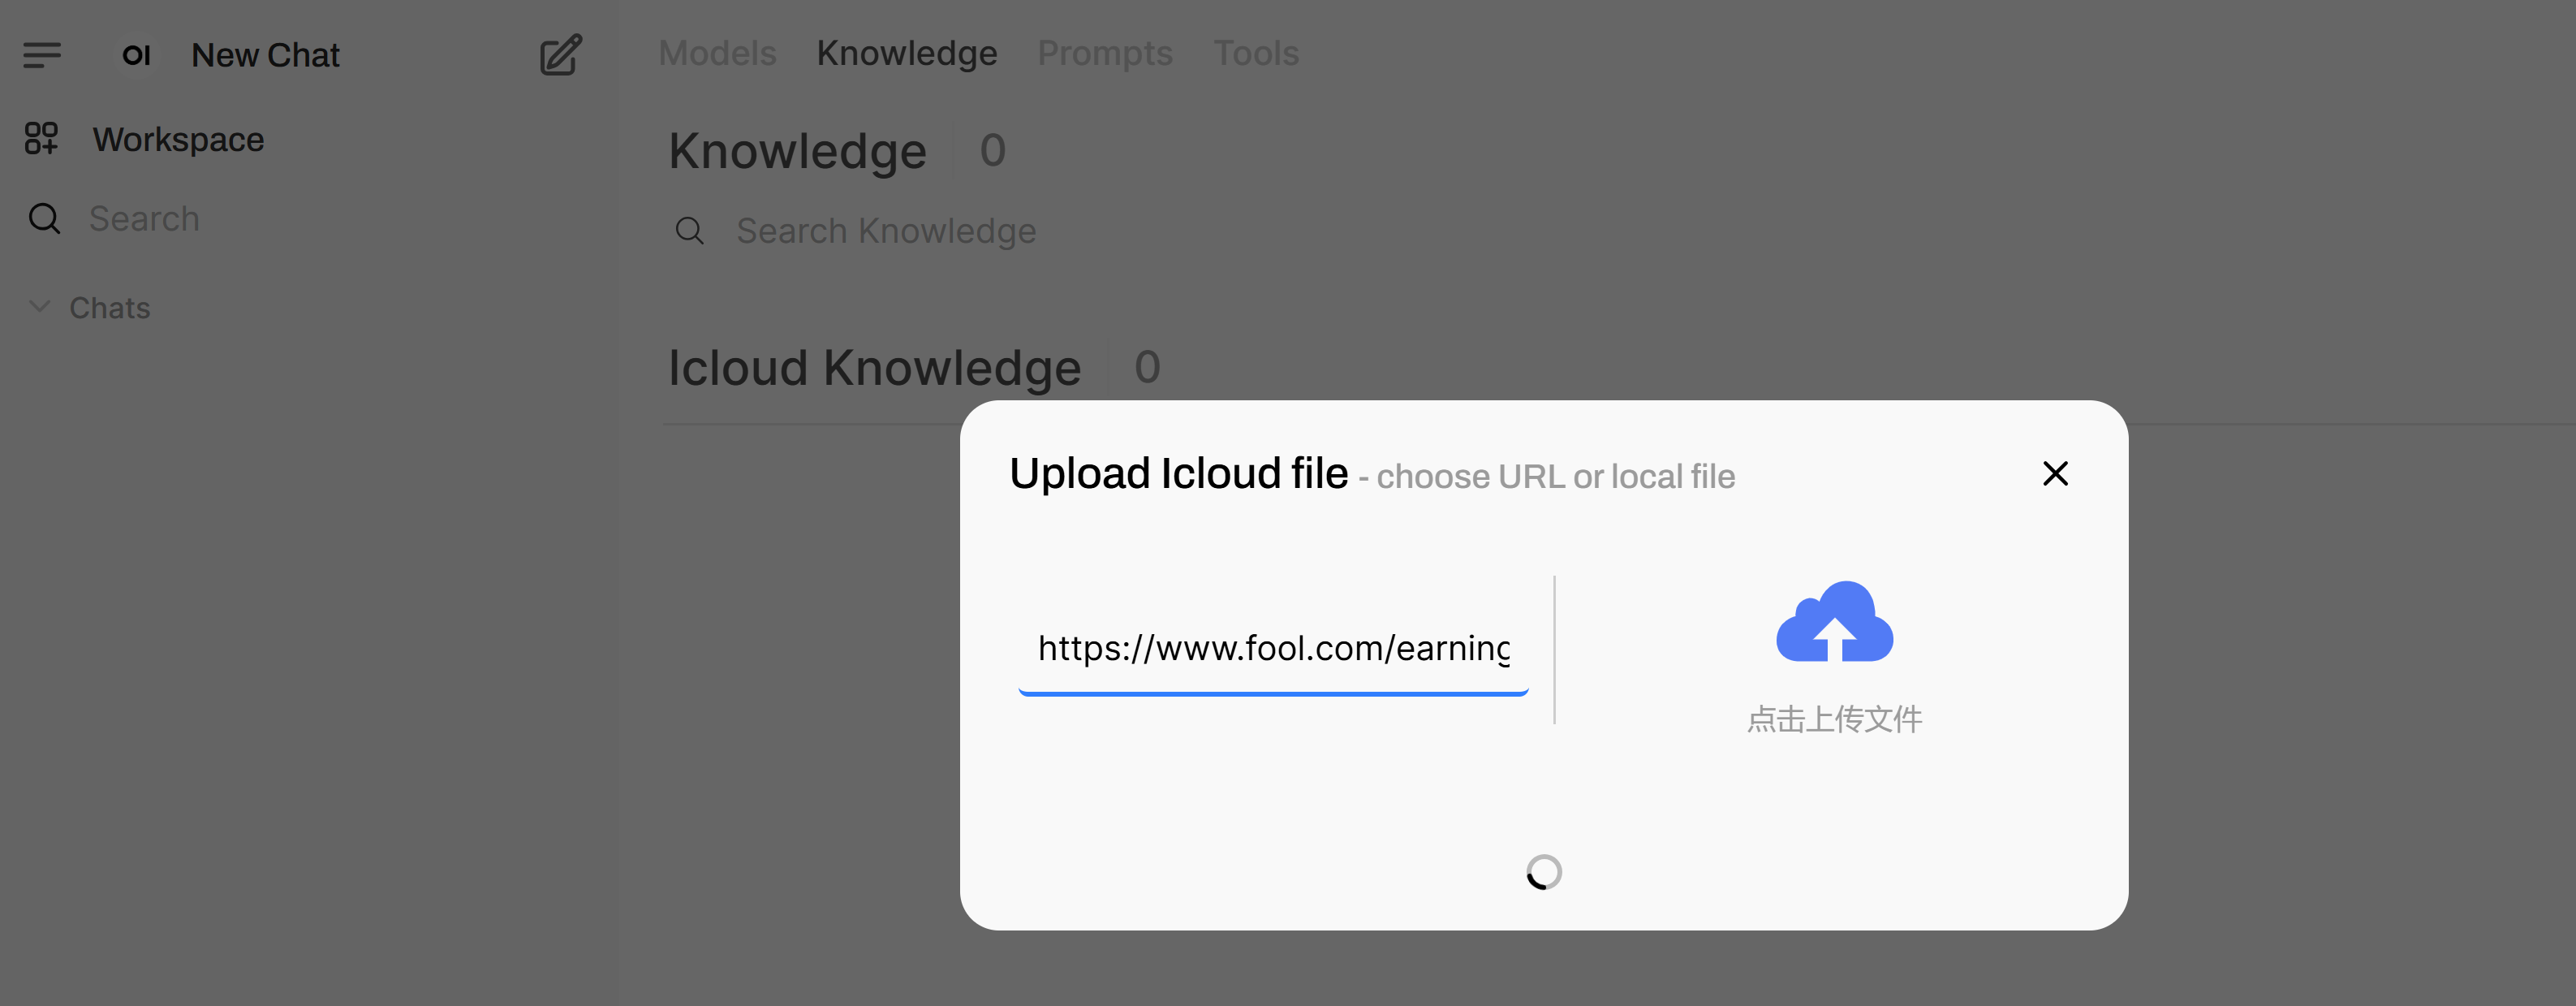
Upload documents with UI
Click on the
Workplaceicon in the top left corner. ClickKnowledge. Click on the “+” sign to the right ofiCloud Knowledge. You can paste an url in the left hand side of the pop-up window, or upload a local file by click on the cloud icon on the right hand side of the pop-up window. Then click on theUpload Confirmbutton. Wait till the processing is done and the pop-up window will be closed on its own when the data ingestion is done. See the screenshot below. Then, enter the dataprep endpoint in theiCloud File APIsection. You first need to enableiCloud File APIby clicking on the button on the right to turn it into green and then enter the endpoint url, for example,http://${HOST_IP}:6007/v1. TheHOST_IPhere should be the host ip of the dataprep microservice. Note: the data ingestion may take a few minutes depending on the length of the document. Please wait patiently and do not close the pop-up window.
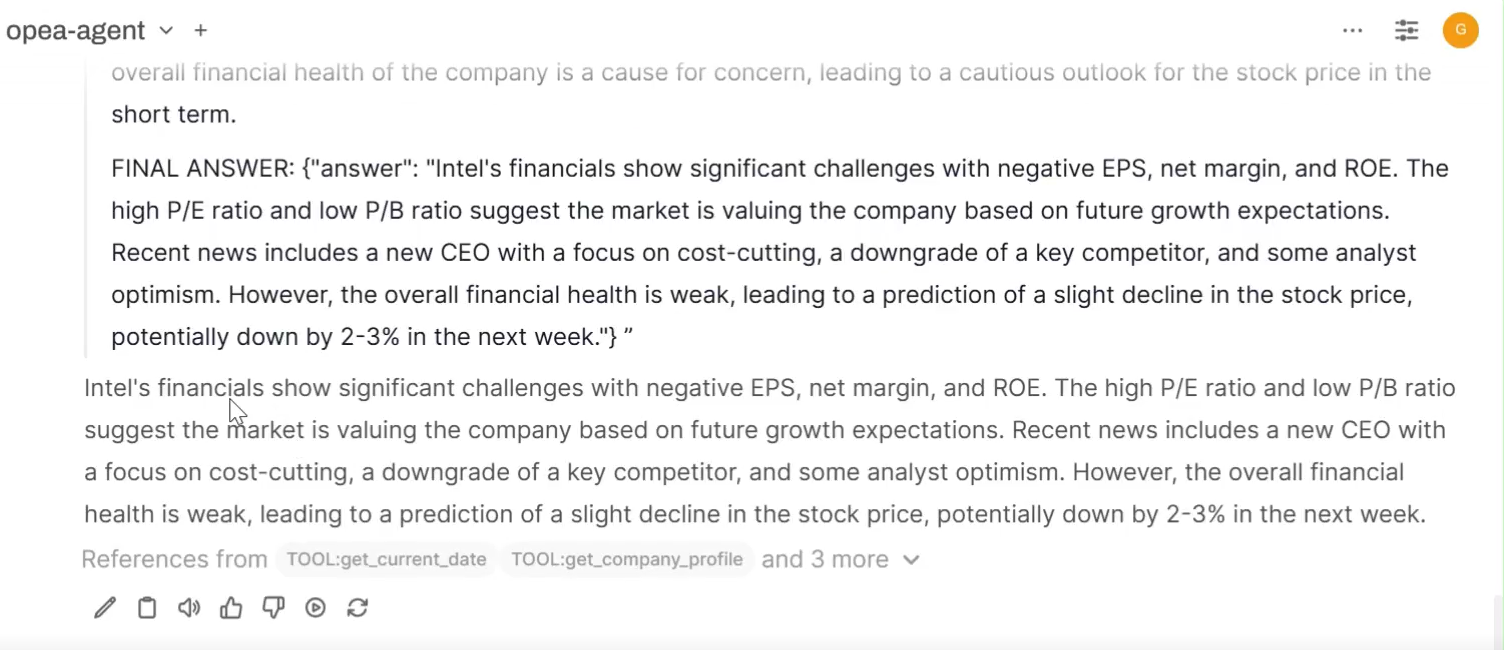
Test agent with UI
After the settings are done and documents are ingested, you can start to ask questions to the agent. Click on the
New Chaticon in the top left corner, and type in your questions in the text box in the middle of the UI.The UI will stream the agent’s response tokens. You need to expand the
Thinkingtab to see the agent’s reasoning process. After the agent made tool calls, you would also see the tool output after the tool returns output to the agent. Note: it may take a while to get the tool output back if the tool execution takes time.