Agents for Question Answering
Table of contents
Overview
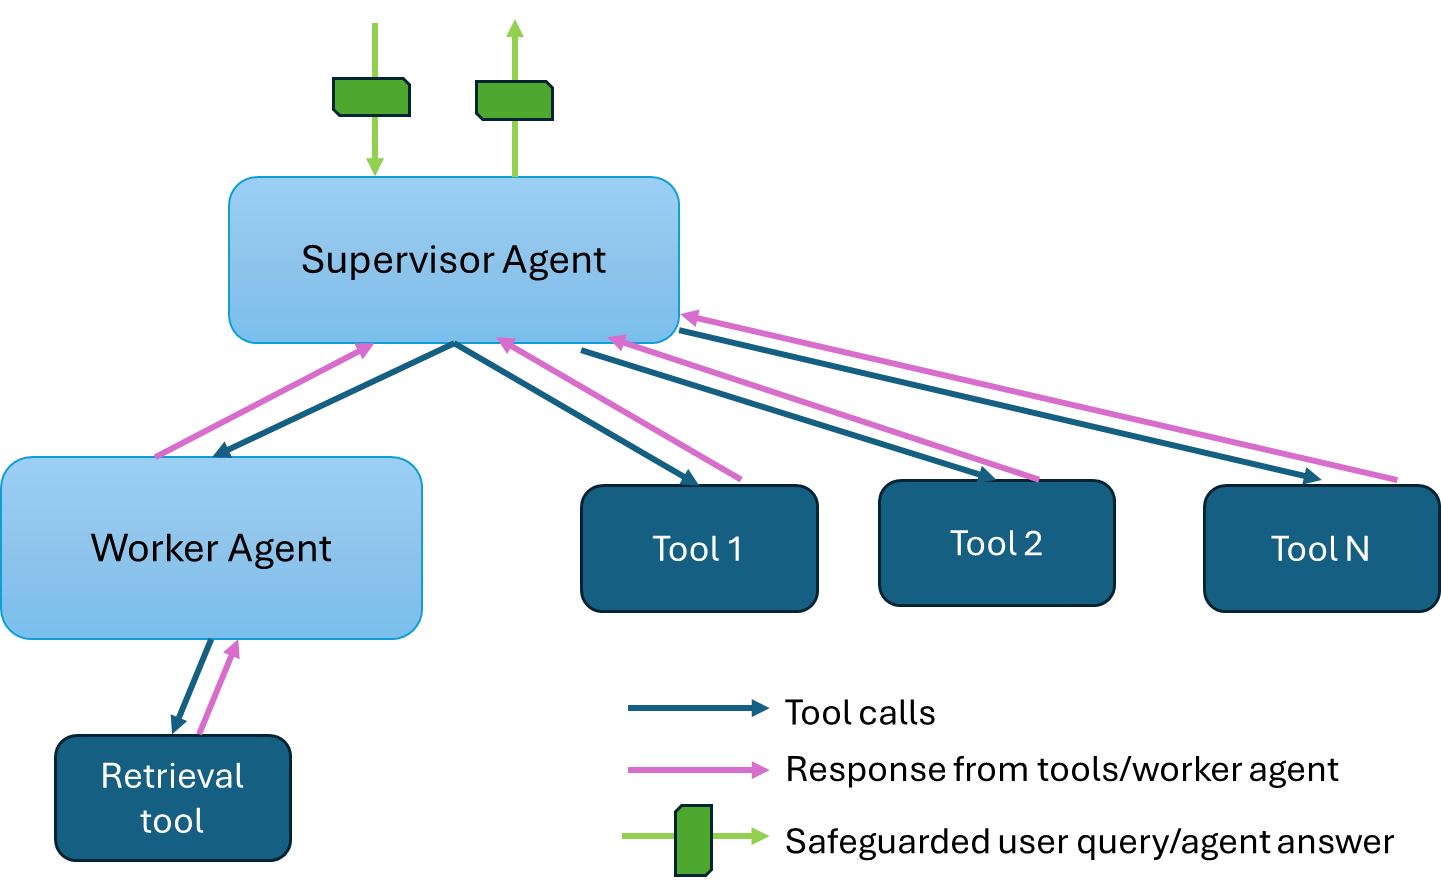
This example showcases a hierarchical multi-agent system for question-answering applications. The architecture diagram below shows a supervisor agent that interfaces with the user and dispatches tasks to two worker agents to gather information and come up with answers. The worker RAG agent uses the retrieval tool to retrieve relevant documents from a knowledge base - a vector database. The worker SQL agent retrieves relevant data from a SQL database. Although not included in this example by default, other tools such as a web search tool or a knowledge graph query tool can be used by the supervisor agent to gather information from additional sources.
The AgentQnA example is implemented using the component-level microservices defined in GenAIComps. The flow chart below shows the information flow between different microservices for this example.
Why should AI Agents be used for question-answering?
Improve relevancy of retrieved context. RAG agents can rephrase user queries, decompose user queries, and iterate to get the most relevant context for answering a user’s question. Compared to conventional RAG, RAG agents significantly improve the correctness and relevancy of the answer because of the iterations it goes through.
Expand scope of skills. The supervisor agent interacts with multiple worker agents that specialize in different skills (e.g., retrieve documents, write SQL queries, etc.). Thus, it can answer questions with different methods.
Hierarchical multi-agents improve performance. Expert worker agents, such as RAG agents and SQL agents, can provide high-quality output for different aspects of a complex query, and the supervisor agent can aggregate the information to provide a comprehensive answer. If only one agent is used and all tools are provided to this single agent, it can lead to large overhead or not use the best tool to provide accurate answers.
Deploy with docker
1. Set up environment 
First, clone the GenAIExamples
repo.
export WORKDIR=<your-work-directory>
cd $WORKDIR
git clone https://github.com/opea-project/GenAIExamples.git
Second, set up environment variables.
For proxy environments only
export http_proxy="Your_HTTP_Proxy"
export https_proxy="Your_HTTPs_Proxy"
# Example: no_proxy="localhost, 127.0.0.1, 192.168.1.1"
export no_proxy="Your_No_Proxy"
For using open-source llms
Set up a HuggingFace account and generate a user access token.
Then set an environment variable with the token and another for a directory to download the models:
export HUGGINGFACEHUB_API_TOKEN=<your-HF-token>
export HF_CACHE_DIR=<directory-where-llms-are-downloaded> # to avoid redownloading models
[Optional] OPENAI_API_KEY to use OpenAI models or Intel® AI for Enterprise Inference
To use OpenAI models, generate a key following these instructions.
To use a remote server running Intel® AI for Enterprise Inference, contact the cloud service provider or owner of the on-prem machine for a key to access the desired model on the server.
Then set the environment variable OPENAI_API_KEY
with the key contents:
export OPENAI_API_KEY=<your-openai-key>
Third, set up environment variables for the selected hardware using the corresponding set_env.sh

Gaudi
source $WORKDIR/GenAIExamples/AgentQnA/docker_compose/intel/hpu/gaudi/set_env.sh
Xeon
source $WORKDIR/GenAIExamples/AgentQnA/docker_compose/intel/cpu/xeon/set_env.sh
For running
2. Launch the multi-agent system. 
We make it convenient to launch the whole system with docker compose, which includes microservices for LLM, agents, UI, retrieval tool, vector database, dataprep, and telemetry. There are 3 docker compose files, which make it easy for users to pick and choose. Users can choose a different retrieval tool other than the DocIndexRetriever
example provided in our GenAIExamples repo. Users can choose not to launch the telemetry containers.
Launch on Gaudi
On Gaudi, meta-llama/Meta-Llama-3.3-70B-Instruct
will be served using vllm. The command below will launch the multi-agent system with the DocIndexRetriever
as the retrieval tool for the Worker RAG agent.
cd $WORKDIR/GenAIExamples/AgentQnA/docker_compose/intel/hpu/gaudi/
docker compose -f $WORKDIR/GenAIExamples/DocIndexRetriever/docker_compose/intel/cpu/xeon/compose.yaml -f compose.yaml up -d
Note: To enable the web search tool, skip this step and proceed to the “[Optional] Web Search Tool Support” section.
To enable Open Telemetry Tracing, compose.telemetry.yaml file need to be merged along with default compose.yaml file. Gaudi example with Open Telemetry feature:
cd $WORKDIR/GenAIExamples/AgentQnA/docker_compose/intel/hpu/gaudi/
docker compose -f $WORKDIR/GenAIExamples/DocIndexRetriever/docker_compose/intel/cpu/xeon/compose.yaml -f compose.yaml -f compose.telemetry.yaml up -d
[Optional] Web Search Tool Support
Instructions
A web search tool is supported in this example and can be enabled by running docker compose with the `compose.webtool.yaml` file. The Google Search API is used. Follow the [instructions](https://python.langchain.com/docs/integrations/tools/google_search) to create an API key and enable the Custom Search API on a Google account. The environment variables `GOOGLE_CSE_ID` and `GOOGLE_API_KEY` need to be set.cd $WORKDIR/GenAIExamples/AgentQnA/docker_compose/intel/hpu/gaudi/
export GOOGLE_CSE_ID="YOUR_ID"
export GOOGLE_API_KEY="YOUR_API_KEY"
docker compose -f $WORKDIR/GenAIExamples/DocIndexRetriever/docker_compose/intel/cpu/xeon/compose.yaml -f compose.yaml -f compose.webtool.yaml up -d
Launch on Xeon
On Xeon, OpenAI models and models deployed on a remote server are supported. Both methods require an API key.
export OPENAI_API_KEY=<your-openai-key>
cd $WORKDIR/GenAIExamples/AgentQnA/docker_compose/intel/cpu/xeon
OpenAI Models
The command below will launch the multi-agent system with the DocIndexRetriever
as the retrieval tool for the Worker RAG agent.
docker compose -f $WORKDIR/GenAIExamples/DocIndexRetriever/docker_compose/intel/cpu/xeon/compose.yaml -f compose_openai.yaml up -d
Models on Remote Server
When models are deployed on a remote server with Intel® AI for Enterprise Inference, a base URL and an API key are required to access them. To run the Agent microservice on Xeon while using models deployed on a remote server, add compose_remote.yaml
to the docker compose
command and set additional environment variables.
Notes
OPENAI_API_KEY
is already set in a previous step.model
is used to overwrite the value set for this environment variable inset_env.sh
.LLM_ENDPOINT_URL
is the base URL given from the owner of the on-prem machine or cloud service provider. It will follow this format: “https://”. Here is an example: “https://api.inference.example.com”.
export model=<name-of-model-card>
export LLM_ENDPOINT_URL=<http-endpoint-of-remote-server>
docker compose -f $WORKDIR/GenAIExamples/DocIndexRetriever/docker_compose/intel/cpu/xeon/compose.yaml -f compose_openai.yaml -f compose_remote.yaml up -d
3. Ingest Data into the vector database
The run_ingest_data.sh
script will use an example jsonl file to ingest example documents into a vector database. Other ways to ingest data and other types of documents supported can be found in the OPEA dataprep microservice located in the opea-project/GenAIComps repo.
cd $WORKDIR/GenAIExamples/AgentQnA/retrieval_tool/
bash run_ingest_data.sh
Note: This is a one-time operation.
How to interact with the agent system with UI
The UI microservice is launched in the previous step with the other microservices.
To see the UI, open a web browser to http://${ip_address}:5173
to access the UI. Note the ip_address
here is the host IP of the UI microservice.
Click on the arrow above
Get started
. Create an admin account with a name, email, and password.Add an OpenAI-compatible API endpoint. In the upper right, click on the circle button with the user’s initial, go to
Admin Settings
->Connections
. UnderManage OpenAI API Connections
, click on the+
to add a connection. Fill in these fields:
URL:
http://${ip_address}:9090/v1
, do not forget thev1
Key: any value
Model IDs: any name i.e.
opea-agent
, then press+
to add it
Click “Save”.
Test OPEA agent with UI. Return to
New Chat
and ensure the model (i.e.opea-agent
) is selected near the upper left. Enter in any prompt to interact with the agent.
[Optional] Deploy using Helm Charts
Refer to the AgentQnA helm chart for instructions on deploying AgentQnA on Kubernetes.
Validate Services
First look at logs for each of the agent docker containers:
# worker RAG agent
docker logs rag-agent-endpoint
# worker SQL agent
docker logs sql-agent-endpoint
# supervisor agent
docker logs react-agent-endpoint
Look for the message “HTTP server setup successful” to confirm the agent docker container has started successfully.
Use python to validate each agent is working properly:
# RAG worker agent
python $WORKDIR/GenAIExamples/AgentQnA/tests/test.py --prompt "Tell me about Michael Jackson song Thriller" --agent_role "worker" --ext_port 9095
# SQL agent
python $WORKDIR/GenAIExamples/AgentQnA/tests/test.py --prompt "How many employees in company" --agent_role "worker" --ext_port 9096
# supervisor agent: this will test a two-turn conversation
python $WORKDIR/GenAIExamples/AgentQnA/tests/test.py --agent_role "supervisor" --ext_port 9090
How to register other tools with the AI agent
The tools folder contains YAML and Python files for additional tools for the supervisor and worker agents. Refer to the “Provide your own tools” section in the instructions here to add tools and customize the AI agents.
Monitor and Tracing
Follow OpenTelemetry OPEA Guide to understand how to use OpenTelemetry tracing and metrics in OPEA.
For AgentQnA specific tracing and metrics monitoring, follow OpenTelemetry on AgentQnA section.